Mostrando entradas con la etiqueta textures. Mostrar todas las entradas

miércoles, 14 de agosto de 2013

Detail textures

type='html'>
What are detail textures?

Detail textures are special kind of textures which if used properly, can simulate plaster, scratches, bumpmaps, etc. They are very easy to use and can improve the the visuals of  the map dramatically. You don't need to compile the map to place the detail textures. They look like this:

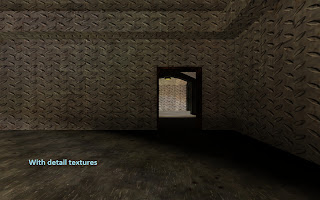
I must admit I have chosen a bad example. However, download a map name de_mon. It features detail textures and the map itself is visually spectacular.
They work as overlays and are placed over the default textures. Contrary to popular opinion, they are compatible in every version of cs.

How to implement detail textures?

Very simple. Just type r_detailtextures 1 in the console while the game is running. If they still don't show up, type r_detailtexturessupported 1 in the console. You need to test it in a map supporting detail texture.
( For czero users: There is an option given in the video menu to turn on the detail texture)

How to make detail textures.

First of all, open a photo editing program like photoshop or gimp and create a new file preferably having a 256x256 resolution. Add a few scratch marks with brushes or insert a new layer full of scratches and dust marks  and change the blending mode to overlay. Experiment with different values and when you are finally done, convert the texture to greyscale colour.

 This is important because detail textures use the middle value of rgb as transparency. So 128 128 128 simulates alpha while any value below or above this value will give a color hue. For eg: you have a pic which has exactly 128 as its rgb value. However, there is a scratch mark in the middle of the texture. The left side of the mark is 188 in rgb and the the right side is 68 in rgb. Hence, only the scratch mark will be visible in game and it will also give a feeling of a bumpmap. A sample detail texture looks like this:


 Now save the the file in tga format and save it in your cstrike/gfx/detail/ folder. If the folder is not present, make a new one. For eg: if my map name is foo then make a folder in cstrike/gfx/detail/foo. If you wish, you can continue without making a new folder but it is a good practice to make a folder and give it your map name.

Now make a text file in your cstrike/maps folder and name it as _detail.txt. For eg: If I have a map called foo.bsp, make a foo_detail.txt file in the maps folder and open the file. Place the following in your file:


   < detail//  < x axis scale>  < y axis scale>

For eg: One of my map whose name is aim_err has the following text file.


C2A1_W1            detail/aim_err/detail1    6.0  6.0
SILO2_WET4B    detail/aim_err/detail2    2.0  2.0

Simple isn't it?

The detail1 and detail2 are my detail textures and the c2a1_w1 and silo2_wetb are the standard texture. The values of the two axis are inverse meaning that lower values like 2.0 will stretch the texture while values like 6.0 will shrink  the texture.

Tips 

Implement the detail texture when you have finished making your map.
Making the x and y axis values are different is not recommended unless the base textures are stretched. This is because the detail textures will use the axis of the base textures as the starting point and will resize as you have specified.
Use detail textures sparingly. This is because they don't increase the r_speeds but they do affect the fps of the map. One good optimization point would be to use a single detail texture file for more than 2 base textures.
The best part is that you can make existing maps like de_dust look great.

This post was made using the Auto Blogging Software from WebMagnates.org This line will not appear when posts are made after activating the software to full version.

sábado, 10 de agosto de 2013

Skybox textures

type='html'>
This guide will show you how to make custom skybox textures for use in your map. For a guide on making the in-game skybox, go here.

Step 1
 Go to www.cgtextures.com and make a free account. As you can see, this site is a great resource for making your own textures. After making an account, go to the skies 360 section and select a sky.

Step 2a
 This step is all about theory so if you want you to start making a skybox, go to the next step.
There are two ways on making a skybox texture. First is to make a terrain with fog and sky using terragen or bryce. You can also use 3d max or maya but the technique is different for making a skybox texture for them.
If you want to make a skybox with terragen, go here.

    A skybox texture is composed of six images arranged in a cubic formation. There are skyboxes and skydomes. The reason games use skybox is because they are less resource intensive than skydomes. The goldsrc engine needs six textures in the gfx/env folder to be able to use in vhe. If your skybox texture name is foo for example then the textures should be named as:

footp
foobk
fooft
foodn
foort
foolf

Step2b


  I downloaded this texture from cgtextures as an example.
I downloaded the lowest quality strip version of this texture. Using a photo editing tool like photoshop or gimp, I divided the textures into six equal parts each of 256x256 dimensions. Now, convert all the textures to .tga format and remember that no matter what dimensions your skybox has, the individual textures need to have a resolution of 256x256 with a 24 bit or less colour depth.

Step3


 Now, give a name to all your textures and put the textures into gfx/env folder. Load up hammer and enter the name you chose for the skybox in the map/map properties/environment map(cl_skybox) box. Remember that the name should be the same for all the six textures and they should end up with the appropriate suffix. Se step2a for the instructions. After that, the map should successfully show the skybox in-game.

Notes:

If you are wondering how to convert panoramic textures then use bixorama or pano-stitch like programs. Bixorama is very easy to use but it is commercial software. Pano-stitch is based on a open source panorama tools.
   Additionally, you can also make a skybox for the goldsrc engine using the source engine. Go here to learn how to make skyboxes from the source engine. If you only want to make a sky 360 texture then skypaint is a great commercial software.


Edit:
Pano2vr is also a  very good tool to convert panoramic to horizontal cross photos. Go here to get pano2vr. Its not free though.
Cgtextures.com have recently updated their skies 360 page. You need an account to buy skies but high quality samples can be downloaded for free. But they have stopped giving skies in dds format.

This post was made using the Auto Blogging Software from WebMagnates.org This line will not appear when posts are made after activating the software to full version.

Adding your own custom textures

type='html'>
This tutorial will teach you how to add your textures to your map.

First, know that textures are simple .bmp or .jpeg images packaged in a .wad file. You can download wad files from gamebanana.  Don't forget to give credit to the author of the wad file. Place your wad file in the cstrike folder. Now open up hammer editor and go to tools>options>textures tab and click on the 'add WAD' button. It will look like this:


After adding your wad, open up texture browser. There the new textures will be present. Just compile your map now and play your map. Keep in mind that when you distribute your map, you also have to give the wad files as well or else the game will crash.

Wadinclude
Now that you have successfully added custom textures, it is time you learn about the -wadinclude command. This is a command line parameter you enter in the advanced compile menu just before compiling your map.

What this command does is; it embeds the .wad files in your .bsp file so you don't need to add a res file and another good thing is that it only adds the textures which are used in your map; eg: if you are using a wad file which is 5mbs but you only used 4 or 5 textures, the rest of the textures carry unnecessary weight to your map


First, open the advanced compile menu. If you don't know what it is, go here. Now click on csg_exe and type  -wadinclude in the parameters tab. It should look like this:
You can also add multiple wads. Just leave a space and enter the wadinclude command again. Like this:
-wadinclude sheikh.wad -wadinclude gg.wad
After that, there is no need to place the wad file in the cstrike folder after your map has been released as the game will automatically get textures from the .bsp file itself.


I will add a tutorial on how to make your own custom textures shortly.

This post was made using the Auto Blogging Software from WebMagnates.org This line will not appear when posts are made after activating the software to full version.

miércoles, 7 de agosto de 2013

Detail textures

type='html'>
What are detail textures?

Detail textures are special kind of textures which if used properly, can simulate plaster, scratches, bumpmaps, etc. They are very easy to use and can improve the the visuals of  the map dramatically. You don't need to compile the map to place the detail textures. They look like this:


I must admit I have chosen a bad example. However, download a map name de_mon. It features detail textures and the map itself is visually spectacular.
They work as overlays and are placed over the default textures. Contrary to popular opinion, they are compatible in every version of cs.

How to implement detail textures?

Very simple. Just type r_detailtextures 1 in the console while the game is running. If they still don't show up, type r_detailtexturessupported 1 in the console. You need to test it in a map supporting detail texture.
( For czero users: There is an option given in the video menu to turn on the detail texture)

How to make detail textures.

First of all, open a photo editing program like photoshop or gimp and create a new file preferably having a 256x256 resolution. Add a few scratch marks with brushes or insert a new layer full of scratches and dust marks  and change the blending mode to overlay. Experiment with different values and when you are finally done, convert the texture to greyscale colour.

 This is important because detail textures use the middle value of rgb as transparency. So 128 128 128 simulates alpha while any value below or above this value will give a color hue. For eg: you have a pic which has exactly 128 as its rgb value. However, there is a scratch mark in the middle of the texture. The left side of the mark is 188 in rgb and the the right side is 68 in rgb. Hence, only the scratch mark will be visible in game and it will also give a feeling of a bumpmap. A sample detail texture looks like this:


 Now save the the file in tga format and save it in your cstrike/gfx/detail/ folder. If the folder is not present, make a new one. For eg: if my map name is foo then make a folder in cstrike/gfx/detail/foo. If you wish, you can continue without making a new folder but it is a good practice to make a folder and give it your map name.

Now make a text file in your cstrike/maps folder and name it as _detail.txt. For eg: If I have a map called foo.bsp, make a foo_detail.txt file in the maps folder and open the file. Place the following in your file:


   < detail//  < x axis scale>  < y axis scale>

For eg: One of my map whose name is aim_err has the following text file.


C2A1_W1            detail/aim_err/detail1    6.0  6.0
SILO2_WET4B    detail/aim_err/detail2    2.0  2.0

Simple isn't it?

The detail1 and detail2 are my detail textures and the c2a1_w1 and silo2_wetb are the standard texture. The values of the two axis are inverse meaning that lower values like 2.0 will stretch the texture while values like 6.0 will shrink  the texture.

Tips 

Implement the detail texture when you have finished making your map.
Making the x and y axis values are different is not recommended unless the base textures are stretched. This is because the detail textures will use the axis of the base textures as the starting point and will resize as you have specified.
Use detail textures sparingly. This is because they don't increase the r_speeds but they do affect the fps of the map. One good optimization point would be to use a single detail texture file for more than 2 base textures.
The best part is that you can make existing maps like de_dust look great.

This post was made using the Auto Blogging Software from WebMagnates.org This line will not appear when posts are made after activating the software to full version.

domingo, 4 de agosto de 2013

Detail textures

type='html'>
What are detail textures?

Detail textures are special kind of textures which if used properly, can simulate plaster, scratches, bumpmaps, etc. They are very easy to use and can improve the the visuals of  the map dramatically. You don't need to compile the map to place the detail textures. They look like this:


I must admit I have chosen a bad example. However, download a map name de_mon. It features detail textures and the map itself is visually spectacular.
They work as overlays and are placed over the default textures. Contrary to popular opinion, they are compatible in every version of cs.

How to implement detail textures?

Very simple. Just type r_detailtextures 1 in the console while the game is running. If they still don't show up, type r_detailtexturessupported 1 in the console. You need to test it in a map supporting detail texture.
( For czero users: There is an option given in the video menu to turn on the detail texture)

How to make detail textures.

First of all, open a photo editing program like photoshop or gimp and create a new file preferably having a 256x256 resolution. Add a few scratch marks with brushes or insert a new layer full of scratches and dust marks  and change the blending mode to overlay. Experiment with different values and when you are finally done, convert the texture to greyscale colour.

 This is important because detail textures use the middle value of rgb as transparency. So 128 128 128 simulates alpha while any value below or above this value will give a color hue. For eg: you have a pic which has exactly 128 as its rgb value. However, there is a scratch mark in the middle of the texture. The left side of the mark is 188 in rgb and the the right side is 68 in rgb. Hence, only the scratch mark will be visible in game and it will also give a feeling of a bumpmap. A sample detail texture looks like this:


 Now save the the file in tga format and save it in your cstrike/gfx/detail/ folder. If the folder is not present, make a new one. For eg: if my map name is foo then make a folder in cstrike/gfx/detail/foo. If you wish, you can continue without making a new folder but it is a good practice to make a folder and give it your map name.

Now make a text file in your cstrike/maps folder and name it as _detail.txt. For eg: If I have a map called foo.bsp, make a foo_detail.txt file in the maps folder and open the file. Place the following in your file:


   < detail//  < x axis scale>  < y axis scale>

For eg: One of my map whose name is aim_err has the following text file.


C2A1_W1            detail/aim_err/detail1    6.0  6.0
SILO2_WET4B    detail/aim_err/detail2    2.0  2.0

Simple isn't it?

The detail1 and detail2 are my detail textures and the c2a1_w1 and silo2_wetb are the standard texture. The values of the two axis are inverse meaning that lower values like 2.0 will stretch the texture while values like 6.0 will shrink  the texture.

Tips 

Implement the detail texture when you have finished making your map.
Making the x and y axis values are different is not recommended unless the base textures are stretched. This is because the detail textures will use the axis of the base textures as the starting point and will resize as you have specified.
Use detail textures sparingly. This is because they don't increase the r_speeds but they do affect the fps of the map. One good optimization point would be to use a single detail texture file for more than 2 base textures.
The best part is that you can make existing maps like de_dust look great.

sábado, 3 de agosto de 2013

Skybox textures

type='html'>
This guide will show you how to make custom skybox textures for use in your map. For a guide on making the in-game skybox, go here.

Step 1
 Go to www.cgtextures.com and make a free account. As you can see, this site is a great resource for making your own textures. After making an account, go to the skies 360 section and select a sky.

Step 2a
 This step is all about theory so if you want you to start making a skybox, go to the next step.
There are two ways on making a skybox texture. First is to make a terrain with fog and sky using terragen or bryce. You can also use 3d max or maya but the technique is different for making a skybox texture for them.
If you want to make a skybox with terragen, go here.

    A skybox texture is composed of six images arranged in a cubic formation. There are skyboxes and skydomes. The reason games use skybox is because they are less resource intensive than skydomes. The goldsrc engine needs six textures in the gfx/env folder to be able to use in vhe. If your skybox texture name is foo for example then the textures should be named as:

footp
foobk
fooft
foodn
foort
foolf

Step2b


  I downloaded this texture from cgtextures as an example.
I downloaded the lowest quality strip version of this texture. Using a photo editing tool like photoshop or gimp, I divided the textures into six equal parts each of 256x256 dimensions. Now, convert all the textures to .tga format and remember that no matter what dimensions your skybox has, the individual textures need to have a resolution of 256x256 with a 24 bit or less colour depth.

Step3


 Now, give a name to all your textures and put the textures into gfx/env folder. Load up hammer and enter the name you chose for the skybox in the map/map properties/environment map(cl_skybox) box. Remember that the name should be the same for all the six textures and they should end up with the appropriate suffix. Se step2a for the instructions. After that, the map should successfully show the skybox in-game.

Notes:

If you are wondering how to convert panoramic textures then use bixorama or pano-stitch like programs. Bixorama is very easy to use but it is commercial software. Pano-stitch is based on a open source panorama tools.
   Additionally, you can also make a skybox for the goldsrc engine using the source engine. Go here to learn how to make skyboxes from the source engine. If you only want to make a sky 360 texture then skypaint is a great commercial software.


Edit:
Pano2vr is also a  very good tool to convert panoramic to horizontal cross photos. Go here to get pano2vr. Its not free though.
Cgtextures.com have recently updated their skies 360 page. You need an account to buy skies but high quality samples can be downloaded for free. But they have stopped giving skies in dds format.